Monday, April 27, 2020

A dress in the 16th c Spanish Style

The Dress
A doublet style dress in the Spanish style featuring reproduction fabric, and curved hanging sleeves, worn over bodies and small farthingale. Accessories include an Elizabethan style bonnet, ruffs and separate sleeves. 

 The Gown - Fabric
The fabric used for the dress is a silk/rayon reproduction from Sartor and is based on an extant fabric in the Metropolitan Museum of art dated to the late sixteenth century. While I haven't seen a portrait using this exact fabric, several use fabrics with a repeated pattern in a similar style just out of the SCA period,  including Margaret of Austria (1634-35) and Isabella de Bourbon (1636). Queen Elizabeth's Phoenix portrait (1575) uses a similar style of fabric, placing the selected fabric in the correct geographic location and time-frame. 

Queen Margarita on Horseback. Valasquez 1634-35. Museo del Prado, Madrid

Isabella de Bourbon, 1635, Valesquez, Museo del Prado, Madrid.

Late 16th C Spanish Silk. Metropolitan Museum of Art, Accession Number 19.116.4.
 The Gown - Pattern and Construction Details.
The pattern for the gown is based on the Woman's Silk Doublet and the Simple Trained gown of wool in Juan de Alcega's Pattern Book Published in 1598 (p15) (please see photo in attached album). The basic bodice pattern shapes were achieved using Margo Anderson's Elizabethan Ladies Wardrobe, which was adapted to reflect the shape and proportions in Alcega. This involved:
o       curving the centre back seam,
o       making a 3 piece collar by extending the collar section on the doublet back and fitting the two front collar pieces
o       adjusting the bodice to fit.

Approximately 6 hours were spend on fitting the doublet bodice over the bodies.

Following the fitting process, the interior shell of the doublet was lined with wool felt and pad stitched to give stiffness and a curved shape to the bodice. Pad stitching was using the sixteenth century to help shape garments and contributed to the stiff look of the garments of this period. Janet Arnold had the opportunity to examine the interior of a number of garments and has included sketches of pad stitching in her book Patterns of Fashion (See photo in attached album).

Initially, the pad stitching was done by hand, however, the repetitive nature of the process did not agree with my hands (arthritis) and an alternative process was found. By curving and stretching the fabrics as they were machine stitched together with a wide zig zag stitch, an approximation of pad stitching was achieved (See photo in album).

After the bodice was shaped, hook and eye tape was applied as a centre front closure. Tape was used rather than the more historically accurate individual hooks and eyes as a matter of convenience. However, the tape also adds an additional stiffening/strengthening layer along the bodice opening, helping to eliminate any stretching over time.

The bodice is lined with gold dupioni silk, seams machine stitched and then hand sew in into the bodice. Careful positioning of the dress fabric ensured that the patter was aligned on teh centre back and centre front seams (although this wasn't necessary to be historically accurate, it appealed to my modern sensibilities and did not result in any wastage of fabric). All seams were hand basted and then machine sewn. All finishing, including hems, attaching sleeves and wings, and applying trim, has been done by hand.

The handing sleeves have been made using Margo's Elizabethan round sleeve pattern, because it closely reflected the shape and style of sleeves in extant portraits.  The back seams were machine sewn after hand basting and trim was applied by hand. The Hanging sleeve is hand basted to the finished bodice under the shoulder wing.

The skirt is entirely based on Alcega's pattern and gives a distinctive backward tilt to the skirt, and quite different to the skirts on my other Elizabethan dresses, which are based on rectangles, cartridge pleated into the bodice waist. This reflects the differences in silhouettes between Spanish and Elizabethan styles.

The Skirt is closed by way of contrasting ribbons tipped with aglets as is commonly seen in Spanish portraits of the era. Upholstery velvet has been used for the guard at the hem to protect the dress fabric. The particular fabric was selected because it best matched the dress fabric in both the shade of black and the sheen.

The skirt is lined with cotton drill to further protect the fashion fabric. Drill was chosen because it doesn't stretch and is harder wearing than the dupioni selected for the bodice and sleeve lining. It was common practice in the 16th century to use plain or lower quality fabrics in areas where it wouldn't be seen.

All of the seams were hand based to ensure the pattern aligned and then machine sewn due to time and physical constraints. To be more historically accurate, construction would have been undertaken by a lady and her Ladies in waiting, with some details possibly outsourced eg lace. Trim, lining and finishing has been done by hand.

I have taken great care to line up the pattern where possible. the angled sections of the skirt are not completely aligned, but the pattern is not jarringly interrupted. this appeals to my modern eye. Judicious positioning and cutting of the pattern pieces minimised any fabric wastage. In period judicious piecing of fabric would have made use of every possible scrap of fabric.

The foundation garments
Bodies
The bodies are a hybrid in style between the Dorothea bodies described and patterned in Janet Arnold's Pattern of Fashion and the Tudor Kirtle in Ninya Mikhalia & Jane Malcolm-Davies's The Tudor Tailor. The Dorothea bodies supplied the shape required for a nice flat front of the Spanish gown while the kirtle pattern supplied the ease and convenience of side lacing- the ease of side lacing for someone who dresses without the aid of a maid cannot be understated and has the added benefit of allowing for some fluctuation in weight.

To achieve a combination of comfort/flexibility and a smooth front, a combination of spiral steel and flat steel bones were used. the flat steel bones were used in the centre front to act as a busk and to support the lacing at the sides, while the more flexible steel bones were used in areas that required more curving or movement. Both the kirtle and the Dorothea patterns have an absence of boning across the bus, which I find comfortable.

The bodies have been constructed from two layers of suit weight linen and a top layer of red taffeta, bound in black satin bias binding. Eyelets have been machine sewn with a round eyelet stitch. The bodies were designed as a 'demo' version to see how it would wear, but several years later I am still wearing them without any adjustment.

Historically, boning would have been from whalebone (baleen), reeds or even rope or cording, all of which are recorded in wardrobe accounts. However, I had a stock of steel boning on hand and decided to use what I had instead of making another purchase.

Farthingale
The farthingale is approximately 12 years old and was made following the pattern and instructions from The Tudor Tailor, with the exception of using flexible curtain wire for the hoops because it can be worn to drive.

The Accessories
Ruffs
The dress is worn with a neck and wrist ruffs. The Ruffs are constructed by applying purchased lace to a finished band of linen and cartridge pleated to a neck band. The ruff is heavily starched and set to form the 'figure 8's'. Once set, the ruffs can be worn repeatedly without loosing shape.

The Hat
Spanish ladies are often depicted in portraits wearing small bonnet syle hats. The bonnet has been made from wired buckram and covered with velveteen. The top of the crown has been padded with wool felt to give a more rounded appearance. All fabrics used were available in period. The hat is finished with a small broach and jaunty feathers.

References
Juan de Alcega Tailor's Pattern Book 1589. Translated by jean Pain and Cecilia Bainton. Originally published by Ruth Bean Publishers.

Janet Arnold Patterns of Fashion; The cut and construction of clothes for men and women c 1560-1620. 1985. Drama Publishing.

Nina Mikhalia & Jane Malcolm-Davies The Tudor Tailor: Reconstructing Sixteenth-Century Dress. 2006. Costume and Fashion Press. 

Wednesday, April 8, 2020

Outlander Costume Updates


The original petticoat/underskirt for this dress needed a little bit more fullness and a slightly stiffer hem. However I didn't have any more of the fabric, so resorted to the age old technique of using the fashion fabric where it was going to be seen (the skirt front and back hem) and filled in the rest with a quilting cotton of a similar weight. This allowed me double the amount of fabric in the back of the skirt to add desired fullness. The hem was faced with a 4 inch wide band of the same quilting fabric, machine stitched along the bottom edge and hand hemmed along the top. The machine stitching wont be seen and adds a little more stiffness.

Plain quilting cotton filling in the back of the under skirt.

Front view of the updated underskirt and stomacher.
 The original stomacher has also been updated using a pattern from Patterns Of Fashion 5. If you are at all interested in historic clothing patterns, then I would highly recommend adding the series to your collection.
An excellent reference series for the historic costumer.
As you can see from the front view, the new stomacher has small tabs sewn onto the sides to make it easier to pin onto the stays underneath and a more decorative tabbed finish on the bottom edge. It was constructed using a top layer of fashion fabric, a layer of courtil and two layers of quilters homespun. It has four pieces of boning to help it sit straight/without wrinkles. The boning is long plastic cable ties.

Inside view showing position of boning channels.


Monday, May 21, 2018

Outlander inspried dresses.

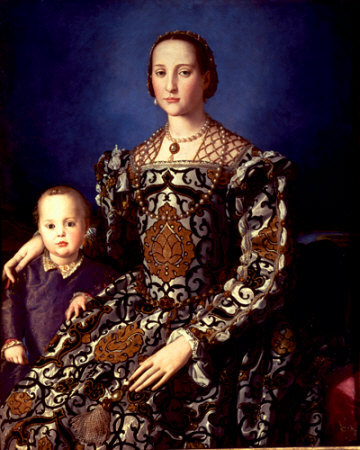
While the poor Eleanora de Toledo dress has been sitting around waiting for attention I have still been sewing. Inspired by the Outlander series and the local Highland Gathering and Quilt Run, I whipped up a dress and hat to wear.


I used the Simplicity patterns for the dress, which was easy to follow and didn't need any adjusting over the stays I had on hand. The amazing Jacobean style fabric for the underskirt and stomacher came from a local quilting shop in Mandurah called 'Sew Connected'. The hat started life as a $7 straw look sunhat in a discount store and was unpicked and restitched to suit the dress.

I wore it to the event and had a ball meeting people. So many people wanted the dress I ran a series of classes on how to make a similar dress at a local arts centre.

Eleanora de Toledo dress....yes its still going.....but getting closer


It has been a long time coming (over 2000 hours) but finally I have finished the black couching on the gold motifs on the skirt....levelling up and moving onto all of the gold couching on the black motifs. There is still a lot of work to do. There are 56 black motifs like the ones above my hand in the photo and they take about 15 minutes each. After that some more work on the large circular motifs before I can move onto the sleeves.

Monday, February 6, 2017

dusts off some cobwebs.....

Well it looks like I may have neglected my blog just a little bit....ok, just a lot. Lets try again shall we.

I am still working on the Toledo gown, and am now down to the last half dozen large gold pieces in terms of the couching, then a few of the smaller pieces and then its on to the gold on black couching. I can actually see that there is an end in sight. Aiming for the SCA Lochac May Crown event, which will be held near Perth, Western Australia. So if you want to see the dress finished and worn, this is the event (and Anealan/Abertridwr hospitality is famous).

Can't wait to start assembling the dress.

Monday, January 19, 2015

January Update

So, as promised, a new month a new blog post...with pictures even.

I am participating in the Historic Sew Monthly Challenge (http://thedreamstress.com/the-historical-sew-monthly-2015/)  and the first challenge is Foundations, so I thought I would make an 1865 elliptical Cage Crinoline using the Truly Victorian pattern TV103. The pattern was super easy to transfer onto Vilene (to preserve the original pattern for future use) and construct and some 20 hours later ...voila, one lovely crinoline. Now I just need to finish a corset, some petticoats and a dress to wear over it. The dress will have to wait till the March challenge.


Over the Christmas break I also did some work to a couple of Disney princess costumes I am making for a costume group I am joining that does a lot of charity work, visits hospitals etc.

Snow white is progressing, but the skirt is just too full when compared to the original Disney version, so I have taken two panels off the back and am reshaping the skirt panels to give less fullness at the waist without loosing too much fullness at the hem.


There has also been progress on a tulle petticoat for under the Cinderella dress. 20m of silver bridal tulle in 9 layers.
 
I have also been making a cotton under dress similar to the 16c kirtles I wear under my Elizabethan clothing. It makes it so much easier to fit over bodices when you have a consistent shape underneath - does that make any sense? The bodice will be boned, probably with a mix of flat and spiral steel to give the support I am after. The skirt is in two layers cut in a full circle trimmed with a frill on each layer. I am hoping that this will help hold the over skirts out a bit more. Pictures of this one to come.
 
After fitting the under bodice, I will have to take in the blue Snow White bodice a little, between 1.5 and 2cm depending on seams. the shoulder seams will have to be dropped a little as well. 

And because it was coming up to a new year, I thought I should try a new dress pattern. This is the Vogue Badgley Mishka pattern V1374 and literally took me 4 hours to transfer pattern to Vilene and get to this stage (hems and binding left to do) it has a lovely cowl back and the fit is just amazing....did I mention 4 hours? At this point I threw it in the washing machine and left it to hang so any stretching can take place before I finish the hem....nope, still haven't finished it lol. But I did make a second version in blue jersey, knee length and I raised the back a little so I can wear it to work.


In an effort to be organised, I have also created a table of all of the projects and events I would like to either make or attend this year. The other thing I am doing is keeping a sewing diary to keep track of what I do or don't do on a daily basis, so I can get an idea of how much time things take and cost. Both are already starting to have benefits. I remembered what I have done so I could do a blog post and I have ordered some supplies for future projects, although this year I am going to try and work my way through some of my existing stash.

And lastly, one of the projects I finished off in November was a sad clown tutufor a lovely ballerina.

Thursday, December 4, 2014

What do you mean it's December already!

Well it seems like the year has flown by and I haven't posted anything since January....ooops. I have been busy doing all sorts of exciting sewing projects, moving house, working my daily 9-5 job and just watching the year scream on by.....so terribly sorry if you have been checking in regularly, because apparently I haven't.

New Years resolution. ..... Blog at least once a month.

I read a few blogs and find the, so useful and inspiring, I really should be sharing more of what I'm doing in return.

Some of the things I have been doing/learning this year, making tutus for a friends daughter and one for myself for a figure skating competition ( small, end of term class comp, don't expect to see me in the Olympics any time soon), learned stretch sewing for my figure skating costumes, a sixteenth century German dress and hat, remaking some Italian style dresses into Elizabethan ones I'll actually wear, and at the moment making some Disney princess dresses.

But if your worried you have missed the great unveiling of THE dress, yes the never ending Eleanora of Toledo gown, never fear....it's still not finished. I really must get stuck into that again. I'll get it set up on its frame again to finish the couching as soon as I sort out the new sewing room.

Next year really should be about finishing off some long term projects, making the Fairy Godmother's dress from the new Cinderella movie, a Melisandra dress for a Game of Thrones cosplay with friends and probably whatever else takes my fancy :) there will definatley be more ice skating costumes and tutus :)

So again, huge apologies to everyone who has been checking in. I'll try to write more next year. Till then (I may post some pics if this years projects later) stay safe and have a fabulously creative festive season x

Saturday, January 25, 2014

Well hello 2014

It seems the more I try to get done, the quicker the days run away. Oh well.....what have I been up too? Casting lots of buttons - 80 have been sent over to Laura for her Eleanora Dress and I have run out of metal so need to get into the city to get some more so I can cast the rest of mine.


Sartor, a Czechoslovakian company has just released a woven version of the Eleanora fabric. It is quite different to mine, but equally as beautiful, the photo doesn't do it justice. I had to buy some ... just to compare it. It wont be made into an Italian style dress though, I have something more Elizabethan in mind for it.


I don't often purchase fabric online, preferring to feel the weight and texture of fabrics rather than look at them online, however the two companies I have dealt with recently for online purchases have been fabulous and deserve a mention:
  • Sartor - the Eleanora and "Swans and Lions" fabrics. beautiful fabric and great customer service; and
  • Kutwell Fabric in Christchurch NZ. I came across some blue wool fabric via a photo on FB, contacted them Monday via email and fabric arrived on Friday. So easy to work with and beautiful fabric.
I have also been busy working on some pretty dresses for work and a few costuming projects that are going to evolve over the year, some 20's, 30's and 40's outfits, a proposal for an artist in residency program and more historical costuming just because I can. Now that I have a new laptop (my other one died.....at a most inconvenient time) I shall endeavour to be more diligent about posting updates.

Tuesday, October 8, 2013

Button success

Success. The buttons are casting nicely :) I have the quantity of metal just about right and the next step will be making more moulds so I can cast a few at a time. 

The basic process is as follows:
The mould is dusted with talk then warmed under a wheat bag while the metal is melted over a low gas flame. When the metal is melted nicely and really fluid I heat the lip of the mini fry pan crucible and quickly pour the molten metal into the mould, wait a minute or so and then lift the new button out. 

The consistency is pretty good, though if you look closely, no two are identical, which is kind of the point of hand crafted things. 

I will be undercoating them in a mat black paint, then spraying them in a nice gold paint and dry rushing with an antique gold to bring out the highlights. Then I'll attach button backs and pop them on the as yet unfinished sleeves :).

Tuesday, October 1, 2013

Has it really been that long?

Oops, its been ages since I posted here. But in my defence I have been doing all sorts of stuff, some of it is even interesting.

I finally made a mould for the Eleanora buttons. I seated the prototype button in a plasticine base and make a collar out of plastic before pouring a 2 part non vulcanising rubber over it to form the mould. I kept my fingers crossed overnight as the rubber set and hoped like mad that I hadn't just destroyed one of the prototypes in the process. Apart from a little bit of the rubber seeping under the edge of the button which had to be trimmed away, the button released from the mould really well and I have a mould ready for casting :)

I have also been teaching myself to make felt and shape hats, this my first attempt at both. Its a little thin in places on the top and I can see where i need to felt it better, but it has shaped up ok and with a coat of shellac to add some extra stiffness, I think it will be ok :) More decoration to follow.
I used a Hat Shaper plastic hat form, which have an Australian supplier in Tasmania, so postage was both quicker and speedier than having to get one (or two) from the US.


I am currently working on making a couple of Spanish 16th c dresses, starting with remaking a Farthingale. I had used a commercial Tudor undergarments pattern and measurements from Alcega (via www.renaiassancetailor.com) but it just looked too big. After a bit of help from the Elizabethan Costuming Facebook group (fantastic bunch of people, very generous with their amazing skills and knowledge) adjusted the hoops down quite a bit for a better shape. I used spring steel boning in the hoops to hold the shape, 11mm spiral steel just didn't cut it. I will find the before and after pictures and add them later.

The first Spanish dress is a remake of an Elizabethan dress I made way back in 2007 when I really had no idea what i was doing, and it will be made up as an early 16th c Spanish number. I am using Margo Anderson's Elizabethan wardrobe pattern. I need a new pair of bodies for both, so will be making up the Dorothea bodies from Janet Arnold's Patterns of Fashion, probably with spiral steel boning - ill see how it fits.


The second Spanish dress will be a late 16th c style with a doublet bodice. I found this amazing fabric at www.sartor.cz and its a reproduction of a piece of 16thc Spanish silk in the Metropolitan Museum and is described as swans and lions - not pelicans - which is a good thing because pelicans in their piety are a restricted charge in the Society for Creative Anachronism...which would have caused some issues as I am not a member of the Order of the Pelican. More details on these as they progress. But isn't the fabric Divine :)


Somewhere I have pictures of a gown I whipped up for a "Not as it seems" feast.....ill add these later.

Talk like a Pirate Day in Fremantle was a lot of fun despite the weather being somewhat windy and wet. I made a little redingote jacket to wear. I had everything except for the buttons in my sewing room. The coat is made up of :
  • a red wool outer fabric
  • interlined with a fairly stiff woven interfacing down to the waist
  • lined with an imitation silk.
  • velveteen collar and cuffs
  • metallic ribbon and braid for the trim.
I used a Truly Victorian pattern as a base and cut away the shape i wanted and added a little on the side. I found the pattern really easy to work with and the pattern pieces went together so nicely, I will be using that pattern/company again. I wore it with a Blond Swan hat which is just too awesome for words. I wore the coat with jeans and boots because of the muddy grass (and I didn't want to pressure sew a skirt just before the event) and a white brocade corset. Just ignore the kirtle its sitting over, I was too lazy to undress my mannequin.


What else? a '20's number for "A Saucy Little Secret" at The Ellington Jazz Club - great show - and some more couching on the EoT skirt. Lots of variety and not much blogging. Ill try to do better :)

Sunday, May 5, 2013

Documentation.

Apparently I cannot add a word or pdf document...sigh. So I have cut and paste the text from my documentation into the section labeled....Documentation. It is, like the dress, a work in progress and as I really have not documented any of my work before, I would be interested in your thoughts and comments. I will add in the images as time permits, because they wouldn't cut and paste.

And I am still couching.....though I may have been distracted by a black and gold german number.

Saturday, March 30, 2013

......and still couching

The couching is progressing, there are only 28 gold motifs left to do on the skirt, and then its on to the gold couching. Incredibly time consuming but slowly progressing towards finishing the skirt.

Lots of projects running along side this one, (photos to come soon) including an elegant evening gown for an awards dinner, a goth Lolita costume ( with aspects of roccoco  and bustle dress in there too) an elizabethan outfit for a friend, teaching basic tunic dress construction to a few people...and the list goes on.

Hopefully my next post will be a celebration of completing the black on gold couching, but till then, enjoy a pic of my elizabethan hat worn with the superbly divine caul made by the supremely talented Laura at http://rockingthefrock.com/ 


Monday, January 28, 2013

and still couching....

So I have been diligently working on the skirt almost every day in the last couple of weeks...except for one Sunday due to a migraine :(.  I did learn to take breaks every half hour and the headaches and eye strain seem to have eased. People are getting quite used to me sewing in the lunch room.

I have been concentrating on couching the black threads onto the gold fabric and have finished the motifs on the top of the skirt and around 1/4 of the side/back. So not much to update really, lots of work done, lots more to go.

On a side note, I made a late 15c German Kampfrau dress to wear to our annual Christmas fundraiser and also so I could show some lovely ladies how to make one (i thought I should make one before teaching it lol). I wore it again to our Midsummer feast a couple of weeks ago and managed to make sure I got a reasonable picture. Having worn it a couple of times, I plan on making some adjustments and adding a black trim to the neckline. But that will have to wait until after Eleanora is finished.

Sunday, December 30, 2012

Couching....and more couching

Couching the details onto the skirt and the moment...and will be for a while :). Progress is slow, but every little bit is a little closer to completion.

Tuesday, October 30, 2012

Trim and random other projects

Lots of waiting for things at the moment. Laura, the other Eleanora dressmaker tracked down some gold and silver trim for the panned sleeves, and it has finally arrived from Morocco. After all that, I am not sure it is a close enough match to use on the dress. So it is in my 'thinking pile' for a while.

I have also finally managed to visit a Moulding/Casting supplies shop in the City to get mould making and casting equipment for the buttons. Hopefully this  means I will be making some real progress on these soon.

Apart from that, not too much progress to speak off on this project, but a number of other things on the go which I will post to the gallery page.

Saturday, September 29, 2012

Buttons

After a few conversations with people much more knowledgeable than I am when it comes to casting, it would appear that one of the best options for the button moulds is a two part, room temperature vulcanising rubber and pewter. That doesn't sound too difficult to organise, as there is a shop in Perth that sells all sorts of moulding equipment and materials. Shame its only open weekdays and difficult for me to get to in business hours. Might need to wait for a day off.

Wednesday, September 26, 2012

Buttons & Skirt Applique

This morning I received my prototype resin buttons from the 3D printer, and am quite happy with the result. The company I used was really easy to deal with, took a lot of care with the product (they cam packed in foam) and were very helpful in making sure they understood what I needed so it didnt cost me lots of money with design edits.

I started by collecting all of the button images from the portrait and working out the main design features. These were translated into a line drawing and series of cross sections and notes for the CAD designers. They took my drawings and truned it into a CAD design file which were printed using a 3D printer into the buttons.


The button shank doesn't look like it will be strong enough or thick enough to cast, so I will probably mould them flat on the back and attach button shanks later. I am looking at different mould making methods and casting materials at the moment. I will need to cast a few :) After they have been cast I will undercoat them in black then paint them in two shades of gold.

But generally, as my first foray into designing and commissioning a piece of work, I have achieved something quite close to what I had in mind. What do you think? Do they represent the portrait reasonably well?

Another major milestone reached as well - All of the applique on the skirt has now been completed. Clocked up 585 hours so far. Moving onto the couching now.


Monday, September 17, 2012

Buttons

I have had a look at the CAD drawings for the buttons and apart from making them a little thicker, I am quite happy with how the drawings are turning into buttons. As soon as I have the prototypes I will post pictures.

Wednesday, September 5, 2012

Skirt Progress & Other Projects

After a 5 hour sewing session I have finally finished the black applique on the skirt :) There are times when I never thought I would see the day lol. I have lots of tiny sections to do one the 'gold' applique now, and then its onto the hand couching.

I have drawn up sketches of the buttons and sent them off to a 3D printer who can apparently convert my pictures into actual prototype buttons via CAD software. It took me hours of staring at the button in the portrait and then about 5 hours of drawing and redrawing before they were somewhat similar to the dress buttons. Impatiently waiting to see what they come back with....

In the meantime, I finished off my blue dress for the 2012 Italian Renaissance Costume Challenge. It was based on Eleanora of Toledo's burial dress. I chose the dress because the bodice and skirt pattern are the same as I am going to be using for the Eleanora dress and thought it would be a good opportunity to test wear the pattern. I have made the dress too long though and consequently its not sitting perfectly on the front hem. A quick tuck will fix that.


Next on the agenda...well one of the next projects in the pipeline is the Perfectly Period Pink Challenge running between September 15 and October 15 which is to raise awareness of Breast Cancer. I have picked out a lovely dress in pink and white stripes - and yes its period :).

I was lucky enough to have a day off to myself to go fabric shopping on Monday, and you will never guess what I found.....

Pink and White striped Silk! at only $10 per meter!!!! They only had 11.5 m left so I bought it all. Its a little light and very slippery so I will probably need to self line it, but how perfect is the colour?

More pics of Eleanora soon :) I haven't got hold of the high resolution pictures that were taken yet.


Thursday, August 23, 2012

Progress...of sorts

Hello everyone :)

All sorts of interesting progress in the background. Nothing with pictures yet though.

Firstly, Laura Sathur Ulak from http://theeleonoraproject.wordpress.com/ and I have been discussing jewellery, fabric and buttons quite extensively. It turns out that there is a company in the UK that can make reproduction fabrics. So we are getting a test sample made to see if the colours etc are OK and to see how much it costs. I am still plowing ahead with my hand made fabric though. So if you have a burning desire to get your hands on some reproduction fabric head on over The Eleanora Club on facebook to keep up to date with progress....because you all know by now how bad I am with updates.

We are also waiting on design drawings from a pewter caster who is working on the girdle and necklace for us. Again, hoping its not going to be too expensive lol.

And my life has been more or less consumed by buttons. I have been talking to a 3D printer who is going to print my button prototypes for me. I just need to clarify exactly what I want, which means studying every button visible on the portrait and working out how they will look in 3D and then drawing it. Slow progress, but will be worth the wait. After I have the prototypes, I will be making/having moulds made to cast the buttons in metal.

I have had a friend take some good quality pictures of sections of the dress and also the inside as people have asked me how bits have been done. So keep watching this space and I'll post them here and on The Eleanora Club fb page.

Other than that, I have finished a blue dress based on the Eleanora burial dress pattern from Janet Arnold's Patterns of Fashion for The Realm of Venus Second Italian Renaissance Costume Challenge. The dress needs some modifications, but generally fits quite well (apart from a little bit of expansion on my part lol).

I have also whipped up a little 1920's number for a friends Cabaret Theatre night at The Ellington - if you are in Melbourne, watch out for 'A Saucy Little Secret' coming to a venue soon. Or check out HMS Popup Productions to see whats going on.

What else....two steampunk coats for a friend, a bustle dress and a 1929 gown are also in progress.

See, I have been far too busy to write blog updates, I have been busy sewing lol

More pictures next time...promise x